


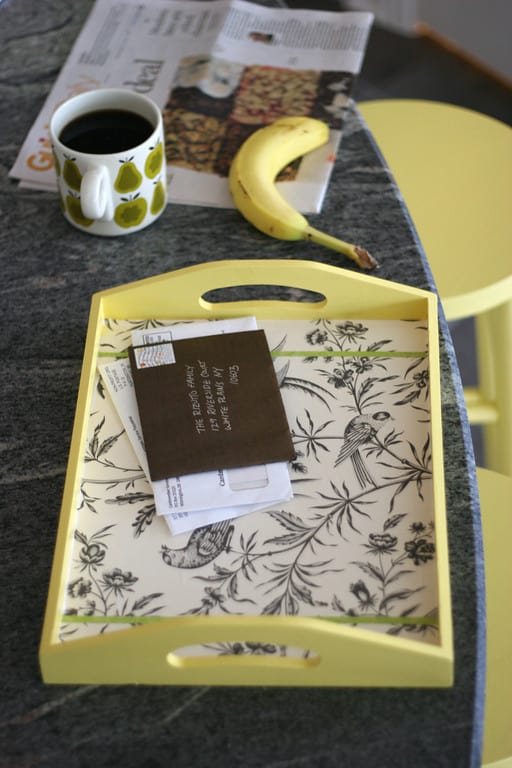
This would be a great gift for a new mom. You could include a mug, a box of tea, a book, and a small journal and pen. This particular tray however, is going to make it’s home on my kitchen island ensuring that the giant pile of mail doesn’t slide off of the counter into the 2 day old glob of pureed carrots on the floor.
This is a quick project and its totally customizable! Have fun!
DIY after the jump…
What you need:
unfinished wooden tray (Michael’s $3.99)
Wood friendly paint
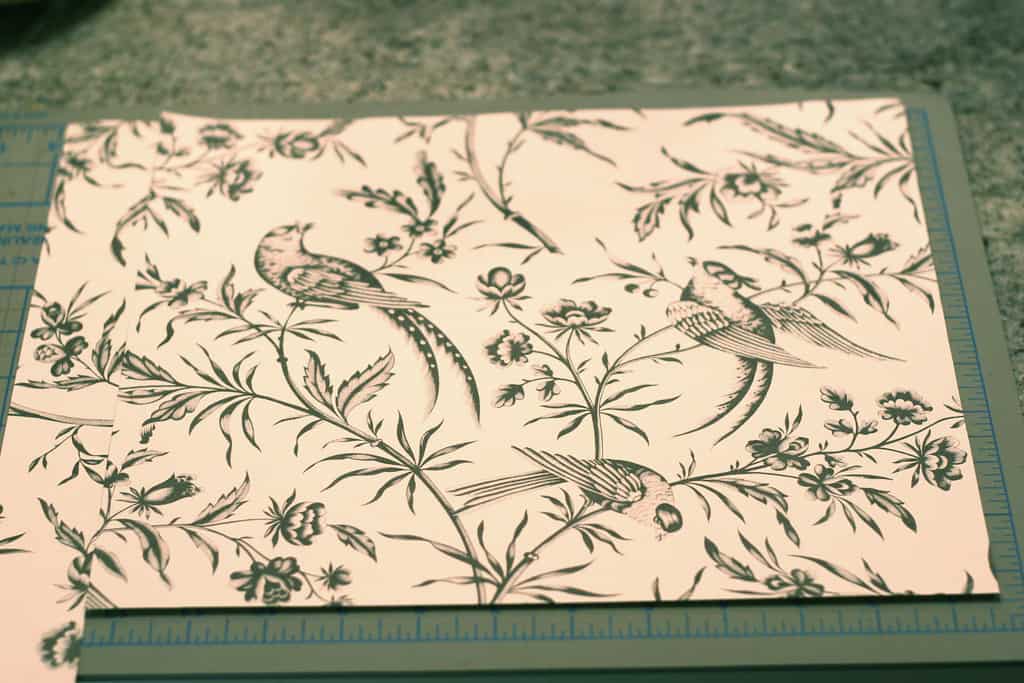
decorative paper (this was from Paper Source, they have lots of beauties.)
Mod Podge![]()
paintbrush
x-acto, cutting mat & ruler
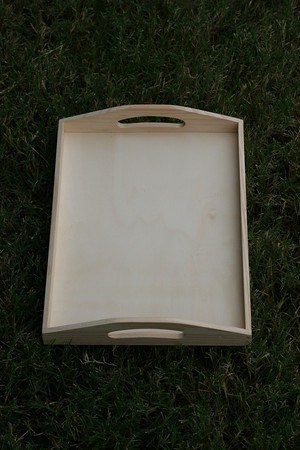
1. Paint your wooden tray your desired color, you can leave the inside (and the bottom, if you wish) unpainted. You will likely need 2 coats. Let dry.

2. Measure the inside of your tray. I did this by laying my decorative paper in the tray and pressing the paper into the opposite corner with my fingernail to make a crease. Very technical stuff.
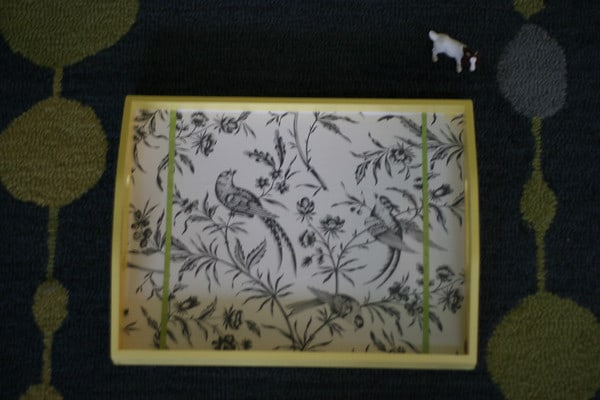
3. Trim paper to size. As you can see here, my paper wasn’t quite wide enough so I used the piece that I trimmed from the bottom and added it to the width. It was still 1/4″ shy which is why I also added the 2 strips of lime paper.
4. Remove paper from tray and apply a coat of Mod Podge to the inside bottom of your tray. Make sure that the surface is entirely & evenly covered and work quickly.
5. Starting from one side, lay your paper in the tray, pressing and smoothing as you go.
6. Apply a second layer of Mod Podge over the paper.
7. You can stop here or you can add some fun elements. A cut out initial, photos, more pretty paper, or even fabric scraps! Just a note, most home printers have water soluble ink that will run, please test images first. Anything professionally printed, magazines etc. should be fine.
8. When you’re finished apply a final layer (or two) of Mod Podge to seal.
9. You may still have a few air bubbles, you can try to smooth these out but don’t worry, when it dries you will hardly notice them, especially if your paper has a pattern.
I had so much fun making this that I immediately bought more trays for other rooms. A nursing station for Quinn’s room, A book tray for Clare’s ottomen, and just something pretty for entertaining! If you would rather purchase a tray, I am partial to thesecustom beauties. Aren’t they gorgeous? I’ll have more trays to show you next week because seriously, I’m hooked on this fun project. If you make one too, send us pics!
I officially now know what my 2.5 year old daughter will be giving everyone for Christmas. I'll replace the paper with some of her art and the grandparents will smile 🙂
What an awesome idea. Wouuldn't this be a great Mother's or Father's Day gift along with breakfast in bed!
JC i am DYING we think alike…i just did a quick pre-work target run and was staring at all the trays thinking what could i do to them. LOVE this! and love ScaredandProfane's idea of having the babe give one as a gift. maybe even with something themed to her, like she loves purple…
Jaime and I were also just discussing how cool these would be with chalboard paint or magnet paint inside!! Oh the possibilities!
I love it ! Very creative ! That's actually really cool Thanks.
What's that gorgeous shade of yellow paint you used?
Can you had clear resin over this
I actually brought that banana in to Home Depot and said… "match this exactly." No, just kidding, it's Zinnia Gold by Behr.
I'd have believed the banana story 😉 We have a very involved relationship with our HD paint guy. He manages not to slap me with a paint stir when I say things like, "no, it's LIKE that shade of magenta, except, like, if it had more port wine in it, and was viewed at 10am in the Southern Hemisphere. In October." I think that makes complete sense. Thanks for the color!
CD – That is so funny! We love our HD paint guy.
Did you know that the paint can openers that they give you at Home Depot can also be used to open beer bottles? It's true.
[…] Photo by Jacinda Cannon Boneau of Prudent Baby […]
[…] a full print tutorial, visit Prudent Baby. And, be certain to check out a other good crafts in the Craft Of The Day slideshow. This entry […]
I just made one of these today…but I had the worst time with the paper and air bubbles. Not even air bubbles, but it wouldn’t stick to the wood and the paper had big waves in it where it would stick, not stick, stick, not stick. I’m not sure what I did wrong! The paper was the right size, the paint was dry, I used mod podge…I am waiting for the mod podge to dry to see if it helps but I was really disappointed with how the paper responded to the top coat of mod podge. It seemed to be ok until I covered it w/ a layer and then that’s when the ‘wave action’ started. Any tips?
Oh no. Hmm. Let’s see what happens when it dries. It can really smooth out. It sounds like it’s in pretty bad shape though… How frustrating.
[…] {via} […]
[…] Get your tools together along with a hefty dose of Mod Podge and get to it! Need a little help? Follow this easy tutorial from Prudent Baby. Category : DIY Projects & Ideas Tags : decorating ideas, diy decor, diy […]
[…] us Thursday for our review of Prudent Baby‘s DIY […]
[…] on Sep 13, 2012 in Craftiness, Crafts, DIY, Gifts, Home Decor, Organization | 0 comments Prudent Baby has gone and done it! A totally cute DIY Tray with a million uses and a […]
[…] buy a pretty little serving tray for a while now (see beautiful examples over at Sand and Sisal or Prudent Baby,) so when I found this rooster-ized tray on clearance at Garden Ridge, I couldn’t pass up an […]
I couldn’t find a tray at Michaels 🙁
I love this idea for the countertop & anywhere! Please don’t take down the link – I pinned it to do when I return stateside & find a tray. Thanks.
[…] couple days ago I came across Prudent Baby’s article on how to customize wooden trays. What a great idea! With a little bit of Mod Podge and […]
[…] table endeavor! This one is an adorable little tray to go on top of said coffee table based on this tutorial. I am painting it bright turquoise since I am obsessed with this color right now but don’t […]
[…] pretty sure any mom’s heart would melt getting this sweet, handpainted box of love.This gorgeous DIY tray is a bit more involved, but what a lovely way to serve breakfast in bed (check our gift guide for […]
[…] Serve mom breakfast in bed on this beautiful tray. Learn how-to at PRUDENTBABY. […]
It is also worth mentioning that this sturdy piece sells for under $800.
Smith, his colleagues and other safety advocates urge parents to anchor
their TVs ‘ whether a flat-screen or CRT ‘ and their stands to a wall to prevent them from tipping over.
The TV mount rails affix to the back of the TV, and the TV is lifted and hooked onto the mount.
[…] Instructions: paint the tray in the color of your choice. Apply two coats and let it dry. Measure the inside of the tray and trim the decorative paper to size. Apply a coat of mod podge to the inside bottom of the tray and lay the paper in. Press and smooth everything as you go. Apply a second layer of mod podge and add some personalized decorations such as photos, fabric scraps, etc. Apply one or two more layers of mod podge to seal.{found on prudentbaby}. […]
[…] I want to make this. […]