


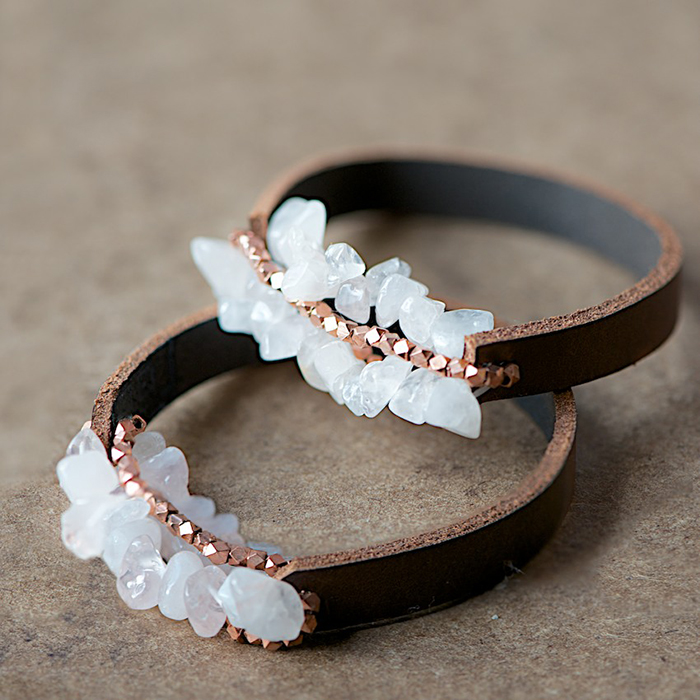
Today we have Anette from Lebenslustiger showing us how to make the prettiest (and super easy) leather bracelet. She made this one with rose quartz and copper beads, but you could customize it however you’d like. You can use your leftover supplies to make her Leather Arrow Bracelet for Valentine’s Day.
Make sure to head on over to her shop to see the other beauties she has made from her home in Germany. I especially love the rose gold ring.

Learn how to make the DIY Chunky Leather Bracelet after the jump…
It is really fall now over here in northern Germany. The last days have been very stormy and the beautiful leaves are dancing in the wind. Winter is near and I was longing to make a leather bracelet with a bit more substance – a bit more chunky with a thicker leather. Can’t wait to wear it with my favorite cozy wool knits! Lucky me there is a leather shop in our small town near by. It’s been there for over 25 years and i think, that is amazing with shops popping up and closing down every few monts these days. They custom make leather goods – mostly pants I guess and obviously do a great job. So from time to time I go visit and the lady let’s me sniff thru their scrap bins. Not for free though – it is business!
Sometimes she charges very little for my finds sometimes I have to swallow before taking out my wallet. We NEVER discuss the prices – it seems “not right” to me to do so – It would feel rude. I’m not sure if she is aware of sometimes charging me much and sometimes charging little. In the end it will all balance out. Like so many things in life, right? Do you do that too? Believing in a natural kind of balance? Last weekend in my workshop I learned about reframing. Do you do that? Trying to see the good in everything? It is a great method for living a happy life and much healthier than beating yourself up over stuff.
It has nothing to do with repressing. If you reframe you consciously see a situation from different angles and perspectives and people have reported, that even in the worst catastrophes you can – in the end – find something positiv. I’am sure, you have heard about those kind of stories.
You can even exercise reframing BUT…
HEY – This is a leather bracelet tutorial!!! – So I might pick up the reframing exercise in a different post:)
Here we go:
If you have seen my other bracelet tutorials you know, that I am font of bracelets with no closure and possible no extra tools or expensive materials.
For this bracelet I used again some elastic cord combined with the leather to be able to easily slide the bracelet over my hand.
I also wanted to use up the rest of those rose-quartz beads. These kind of natural, free-form little gemstones cost only pennies but of course you can use any beads you like.
I also used my favorite facetted spacer beads in copper.
For the elastic I like to use Gosshammer Floss but Magic Stretch will also work.
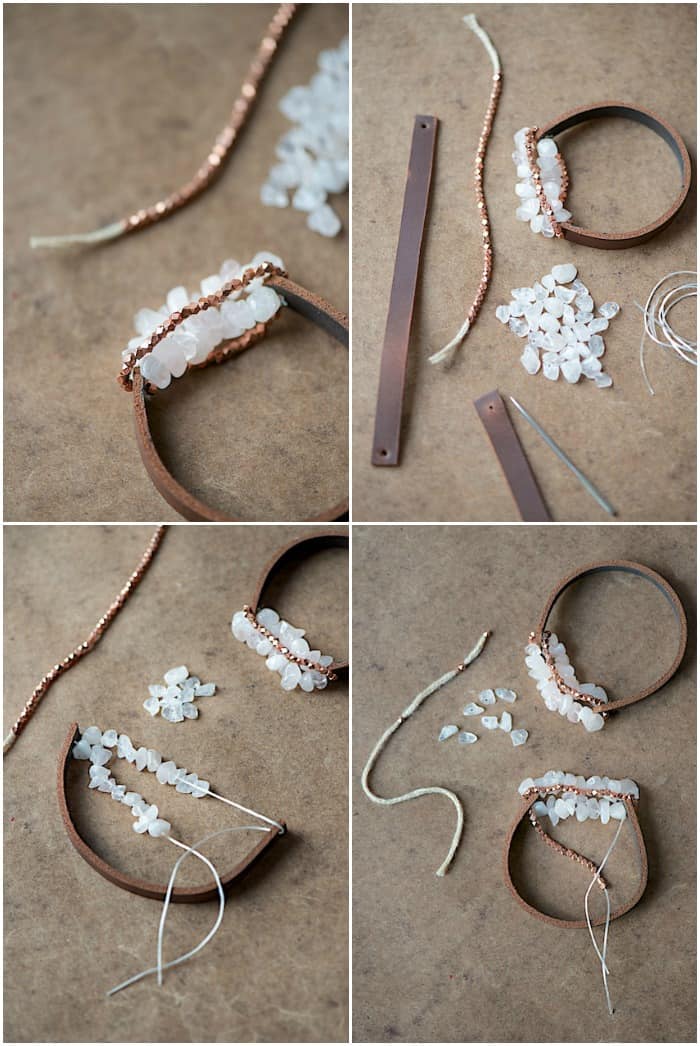
My piece of leather is about 14 cm long, 1cm wide and 2,5mm thick.
My wrist has a circumference of 16cm. Please adjust to the size you need.
Pieces from old broken belts are perfect for this project.
Punch a hole on both ends of the leather. With a tool or with a thick, sharp needle. If you use a needle mark where you want the hole and then press the needle alternating from both sides until you are able to push the needle all the way thru. It takes a bit time and carefulness (do not pierce yourself!) but it will work.
Then start by going thru one of the leather piece holes leaving a tail (Pic4) and then start threading one sort of beads on your elastic over a length of about 4,5 -5 cm. Then go thru the hole on the other side of your leather piece and thread more beads creating a sort of circle with your beads. It’s kind of an elastic bead loop. Close that loop near a leather piece hole with two overhand knots. I don’t leave any extra stretchy string room but I also don’t pull super tight to have no elasticity left.
Then the elasticity is sufficient enough to let the bracelet slide over the hand onto the wrist. I placed the knots on the lower or “inner” part of the elastic bead circle to make them less visible.
The measurements are for a wrist circumference of 16cm. Please adjust to your size.
If you have never worked with elastic jewelry cord: You are able to pull gently on both two endings of an overhand knot sliding the knot closer to the beads until it is really tight. Do another overhand knot if possible. Cut the endings.
Now take another piece of stretchy string and do another circle with different beads in the same manner you did the first loop.
You can also use the same beads you already used for the first loop. It’s up to you…
There might be even room to do a third loop…
Have fun with it – please ask me if you have any questions regarding this or my other tutorials or just say “Hi” and make my day 🙂
Thanks so much for visiting,
Happy Day,
Anette
I love the variety of natural elements featured in this bracelet! Would also work with sea glass.
I can’t wait to make this. So wonderful!
Thanks for your insight for your fantastic posting. I’m glad I have taken the time to see this